DevOps
How does Ori approach security-by-default?
Ori secures your clouds environments with zero-trust microsegmented networks and secure secret management.
This deployment walkthrough demonstrates how Ori simplifies and automates complex orchestration tasks, ensuring seamless communication between clusters.
Greetings again Kubernetes enthusiasts! Last time we took a deep dive into inter-cluster networking in order to enable the orchestration of applications that can communicate with each other cross cluster. We achieved this leveraging the Cilium CNI and its ClusterMesh functionality. We teased at the end of that blog post that there was a better way to achieve the same outcome without all the complexities of setting up an advanced CNI.
The outcome remains the same, we'll have a front-end server and a backend database deployed on two different clusters. The difference is that we can greatly simplify how we ensure these applications can freely communicate with each other.
You need some clusters to deploy to. For the purposes of this blog post we will setup two clusters. I will be using 1 cluster in GCP (GKE) and a Minikube cluster in my home lab.
There are some conditions that need to be satisfied.
With these prerequisites in place, we can dive into the process.
The first step in our process is to have two Kubernetes clusters at our disposal. Each cluster will host one part of our application—the frontend and the backend.
I'm assuming you already have two clusters set up. If not, there are numerous resources available online that walk you through setting up your Kubernetes clusters.
As stated, I'm going to use a GKE and a Minikube cluster in this example. If you wish to do similar, the Google Kubernetes Engine (GKE) resources and Minikube documentation can help you get started with some clusters.
Ensure you have kubeconfig files for both clusters. These files contain the necessary details to connect to and authenticate with your cluster. We'll call them cluster1-config and cluster2-config for this walkthrough.
If you haven't already signup and sign into your OGC account. https://ori.co/signup
Once you are logged in, navigate to the Clusters section on the sidebar and click Add Cluster.
On the next screen give your cluster a name. Ensure the default project is assigned and click create.
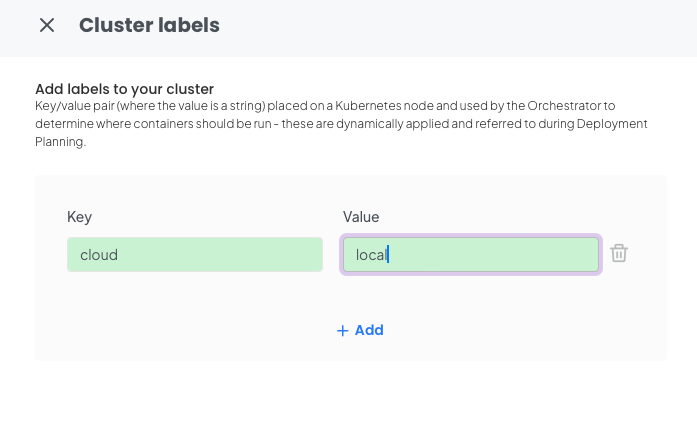
You will be presented with the following screen. You should add a custom label for your first cluster in this case for our minkube cluster lets set cloud=local.
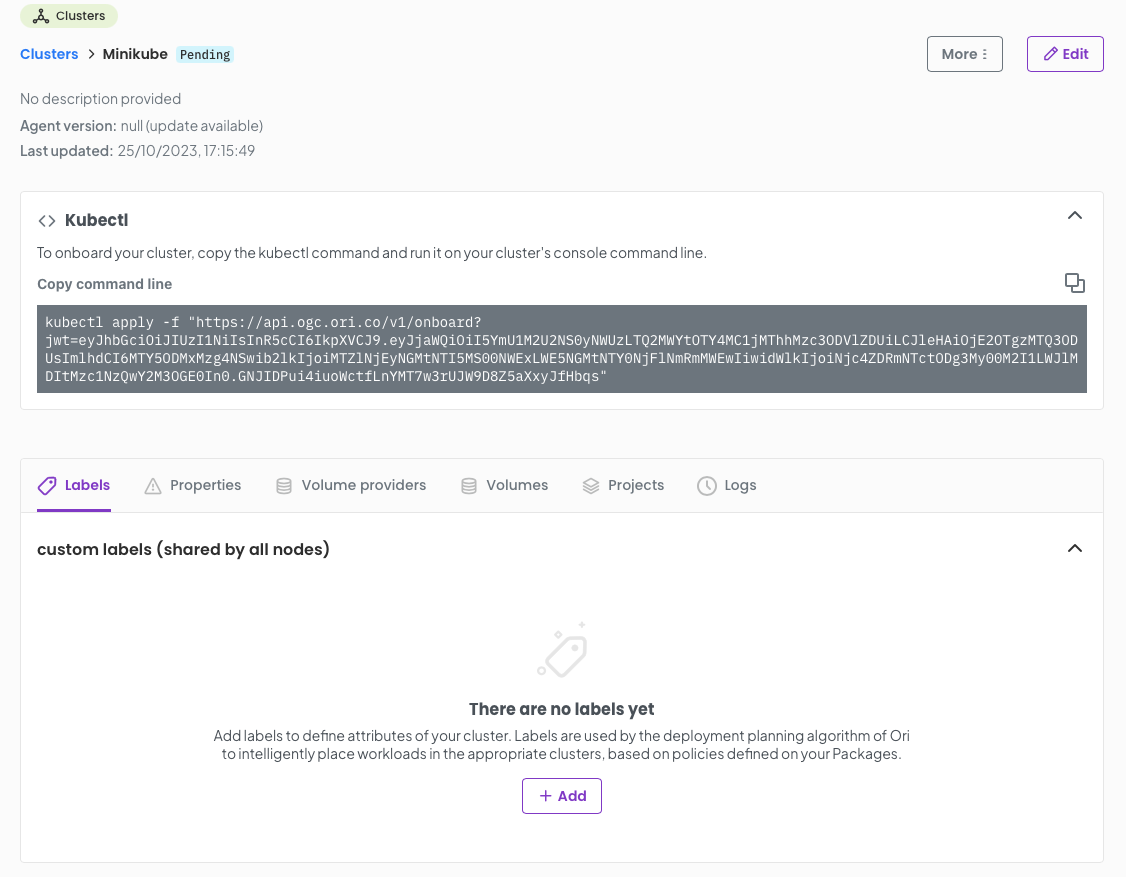
Once you have done this you can copy the kubectl command.
Let's set our context to our first cluster Cluster1 in this case the minikube cluster.
Now execute the kubectl command you copied from the OGC cluster management page, for example:
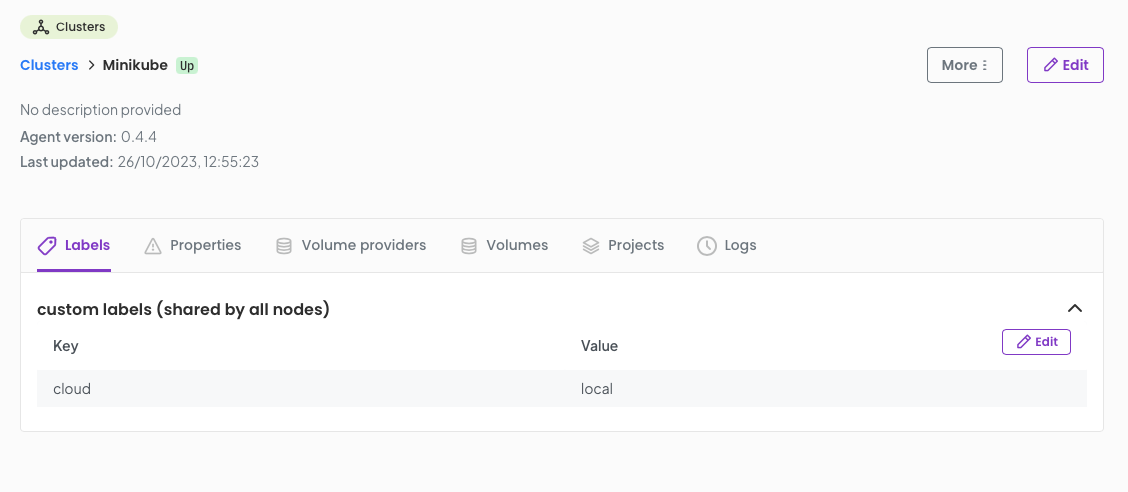
After a few moments you will see you cluster attached to OGC with a status of Up.
Repeat this process with your second cluster in my case a GKE cluster.
The processes is the same, but you will want to set a custom label of cloud=gcp
As we stated in the introduction we are going to deploy a front end server and a back end database. For this example im going to configure a wordpress site.
The wordpress front-end will be deployed on my GKE cluster and my database backend will reside on the minikube cluster in my home lab.
Let's build a package.
From the sidebar select Packages and click Add Package
Name your package wordpress and click Save.
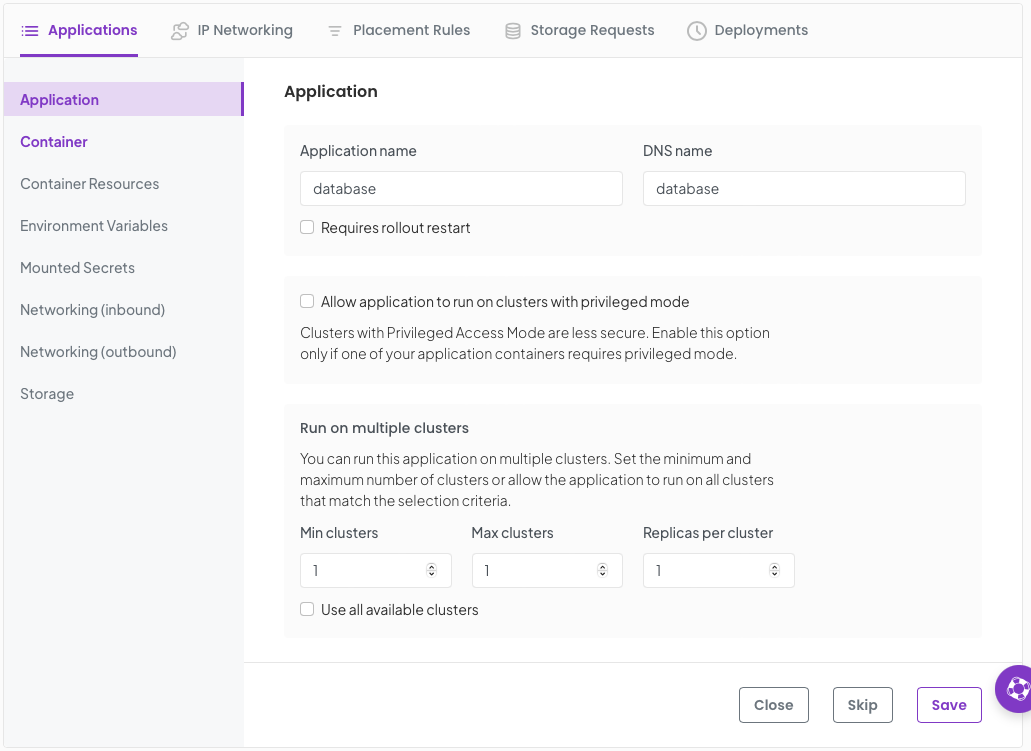
We now enter the package wizard where we are going to start by defining our wordpress front end.
We start with our Application name in this case wordpress-fe you can ignore other options on this screen. Click Save and Continue

Now we will define the container and its requirements in the following screens;
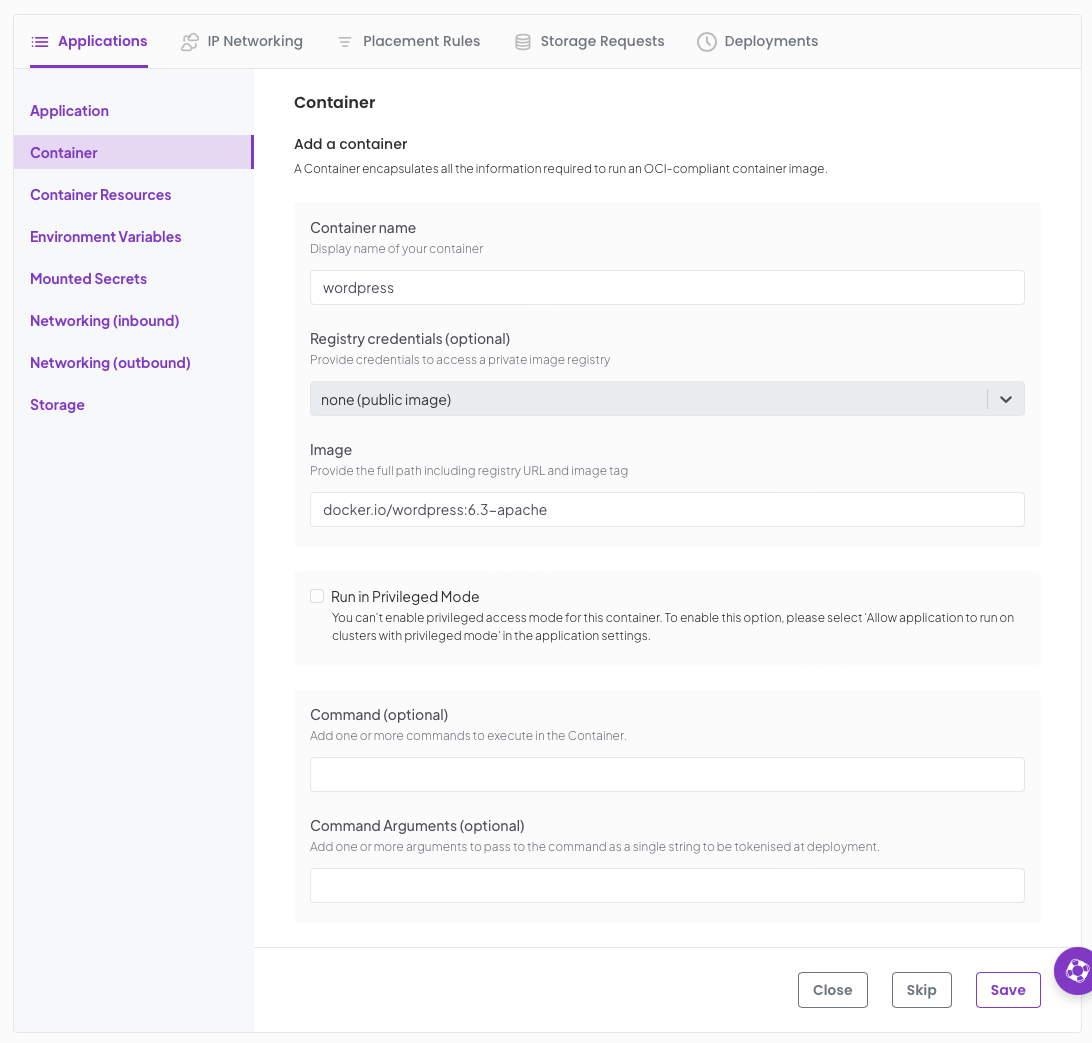
Set the container name as wordpress image as docker.io/wordpress:6.3-apache
Under Environment Variables we are going to create a secret and set some values
First is the secret; Click Add Secret
Define a new secret called WORDPRESS_DB_PASSWORD and set a new password of your choice. We will use this secret in both your wordpress application and your backend database.
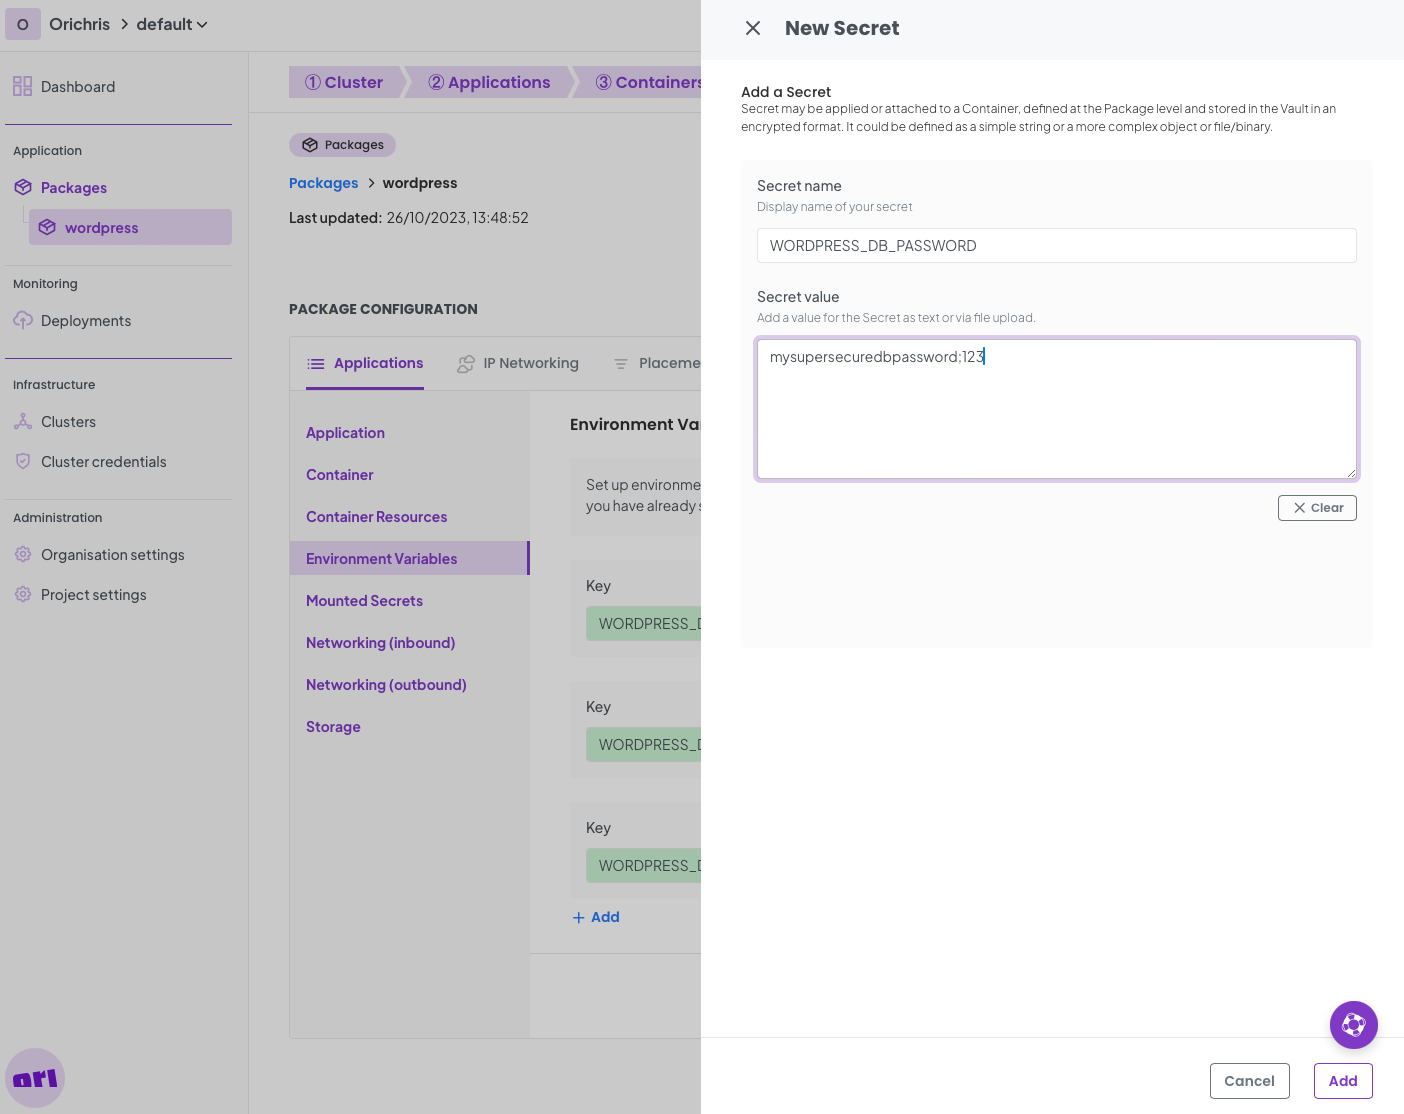
Click Add and then Save on the next screen.
Now we define the Environment Variables required for wordpress.
First up is the WORDPRESS_DB_HOST this is the internal FQDN of our backend database and since Ori constructs these in a predictably we can set this now. the format is; [application].[package].[project].[orgnaisation].orinet.ori.cloud
So in my example I know the application name for the backend database will be database so my FQND for that will be database.wordpress.default.ori---chris.orinet.ori.cloudOn the Environment Variables screen set the WORDPRESS_DB_HOST accordingly. If you are following this closely its likely you will just need to amend the organisation part of the FQDN.
Next up is WORDPRESS_DB_USER set the value to wordpress.
Finally lets set the WORDPRESS_DB_PASSWORD variable, this will be of type Secret and Value will be that of the name of your secret you setup earlier, WORDPRESS_DB_PASSWORD
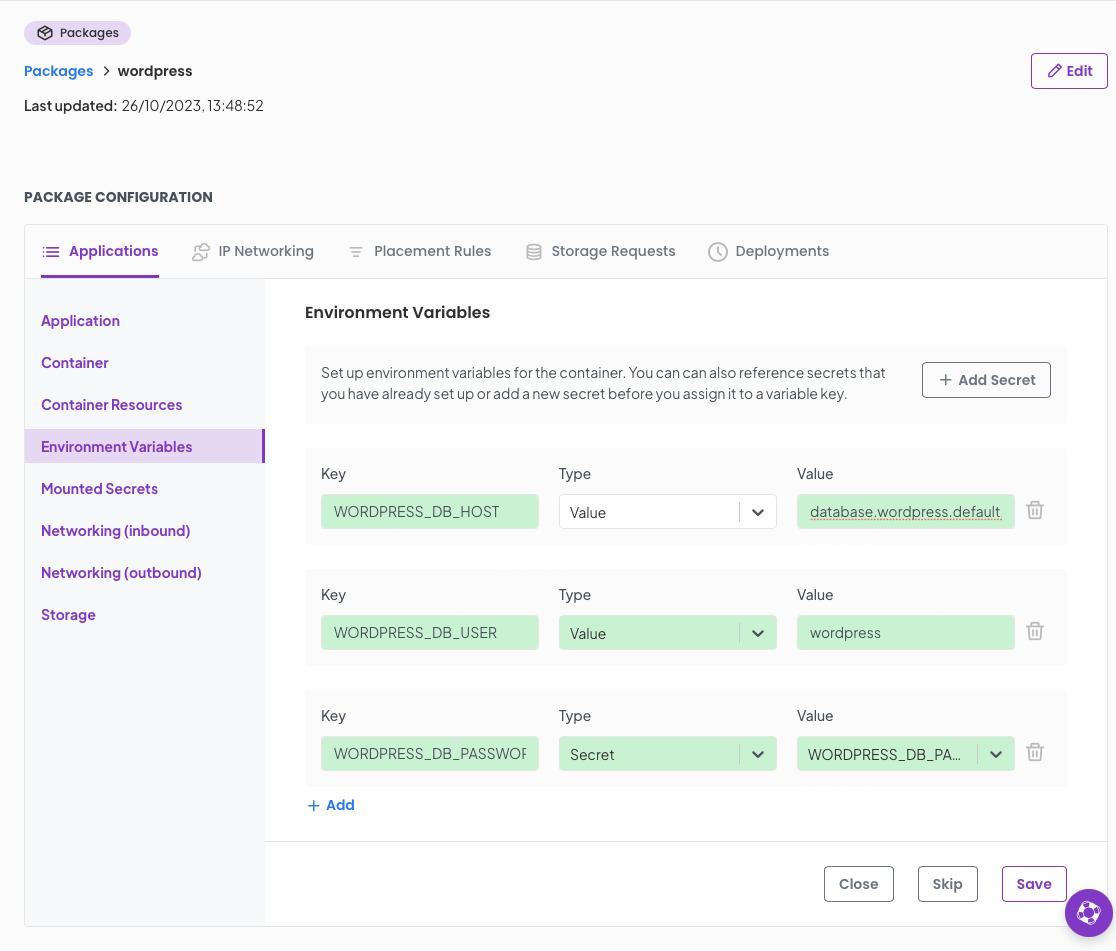
Click Save.
Moving on we need to setup some networking for out wordpress front end :) Select Networking (inbound)
Set a port of 80 and allow connections from anywhere This allows you to browse to your wordpress instance.
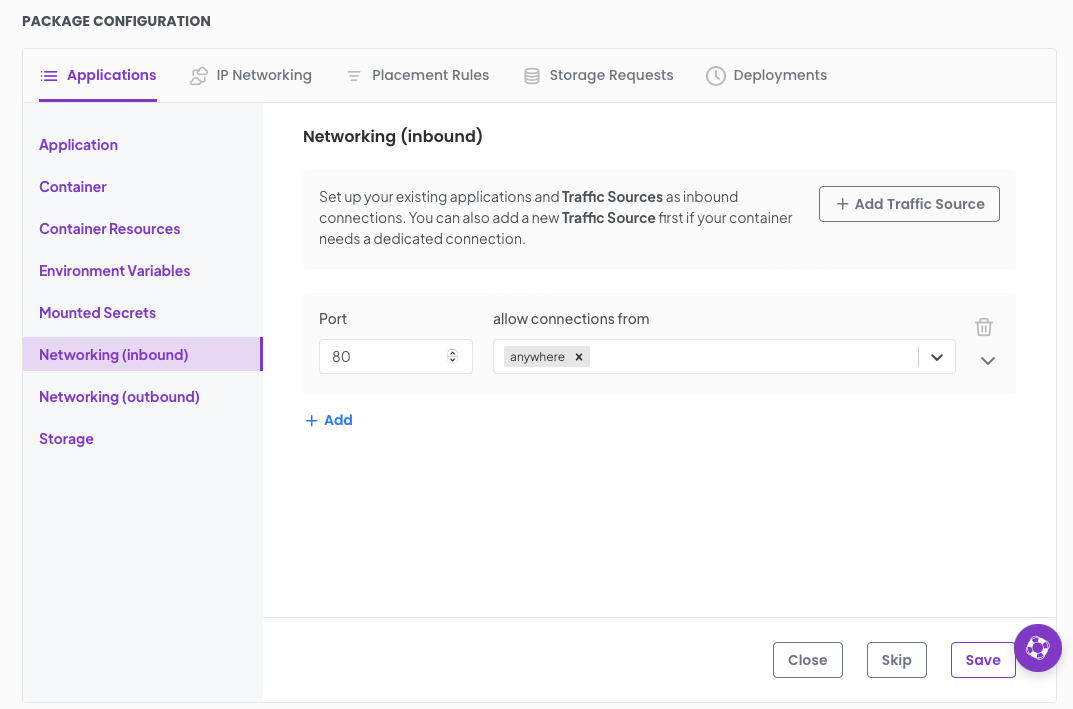
Click Save.
Great! Now we have completed the packaging for our wordpress front end. Let's move onto the database backend.
Click on the Applications tab in the package configuration and then Add new Application

Set the Application name to database
Click Save
Set the container name and and image
name : database image : docker.io/mysql:8.0
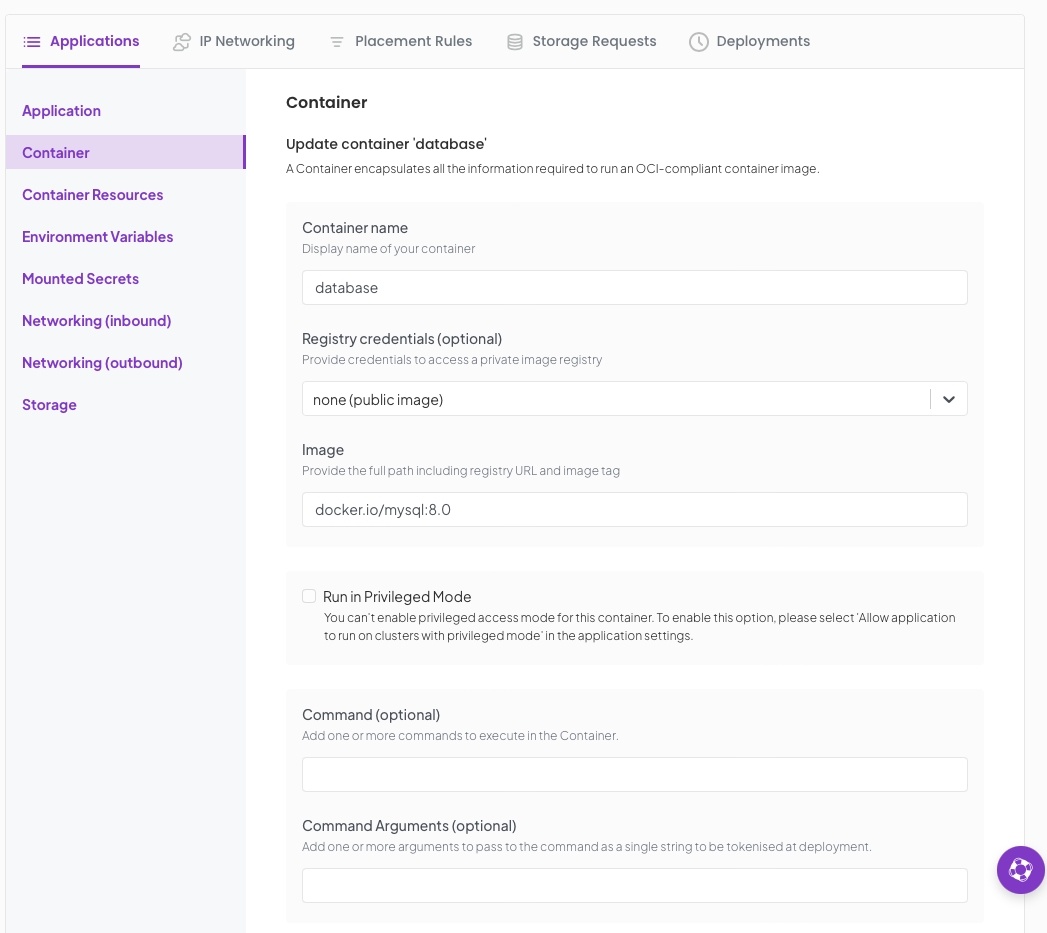
Click Save, then click Enviroment Variables
Set the following environment variables;
MYSQL_ROOT_PASSWORD Type Secret Value WORDPRESS_DB_PASSWORD MYSQL_DATABASE Type Value Value wordpress MYSQL_USER Type Value Value wordpress MYSQL_PASSWORD Type Secret Value WORDPRESS_DB_PASSWORD
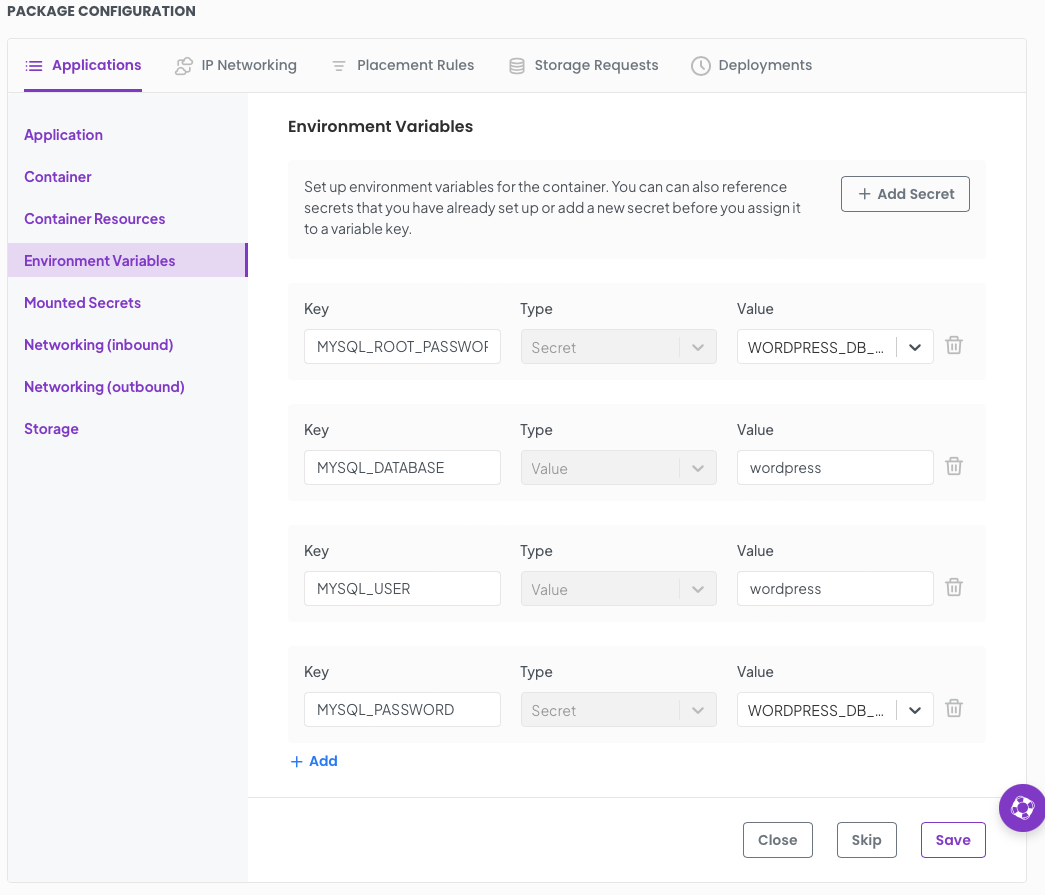
Click Save.
Now we move onto networking. this is where we connect the frontend to the backend. Exciting!
Set a Port to 3306 and allow connections from, wordpress-fe
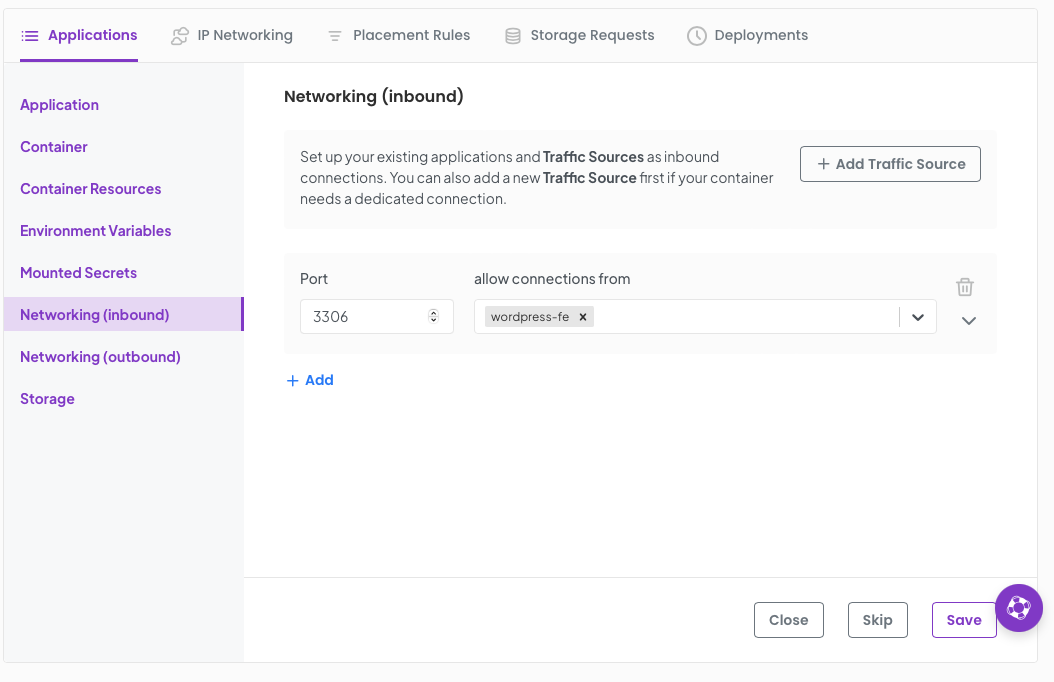
Click Save.
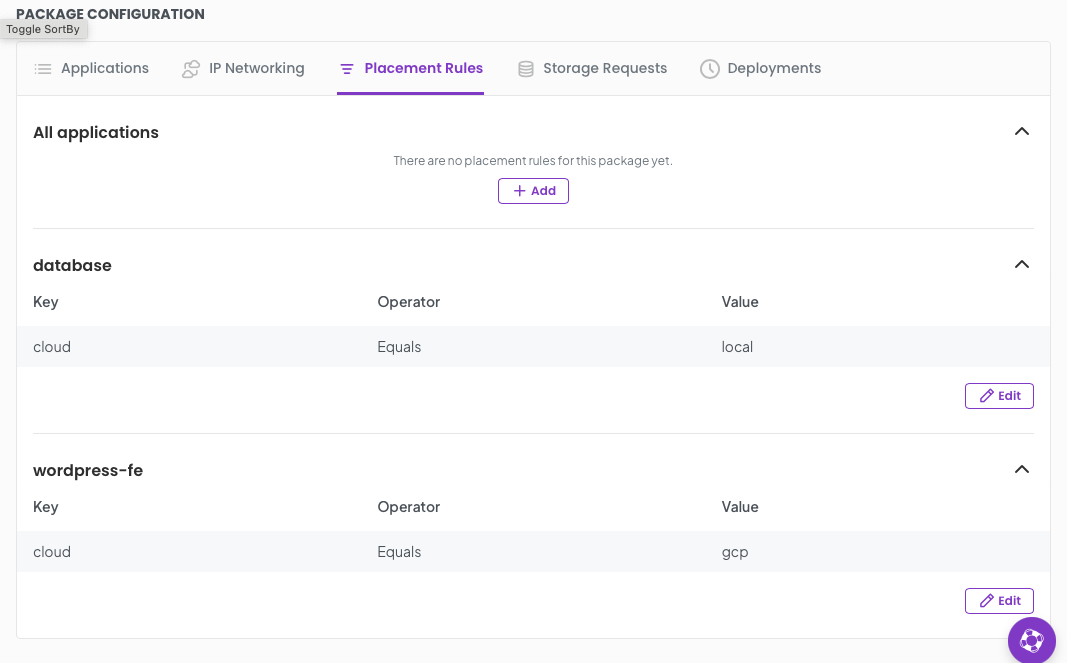
Ok one last part. Remember we said we wanted to deploy our front end in GCP and the backend in my local lab minikube? We achieve this with placement rules.
Click on the Placement rules tab, you will see All applications, database and wordpress-fe. We want to set explicit placement rules on the database and wordpress-fe.
Click add under each section for thease applications and add the following key values
for database add cloud Equals local for wordpress-fe add cloud Equals gcp
Thats it! We have successfully configured our package. All we need to do now is deploy it.
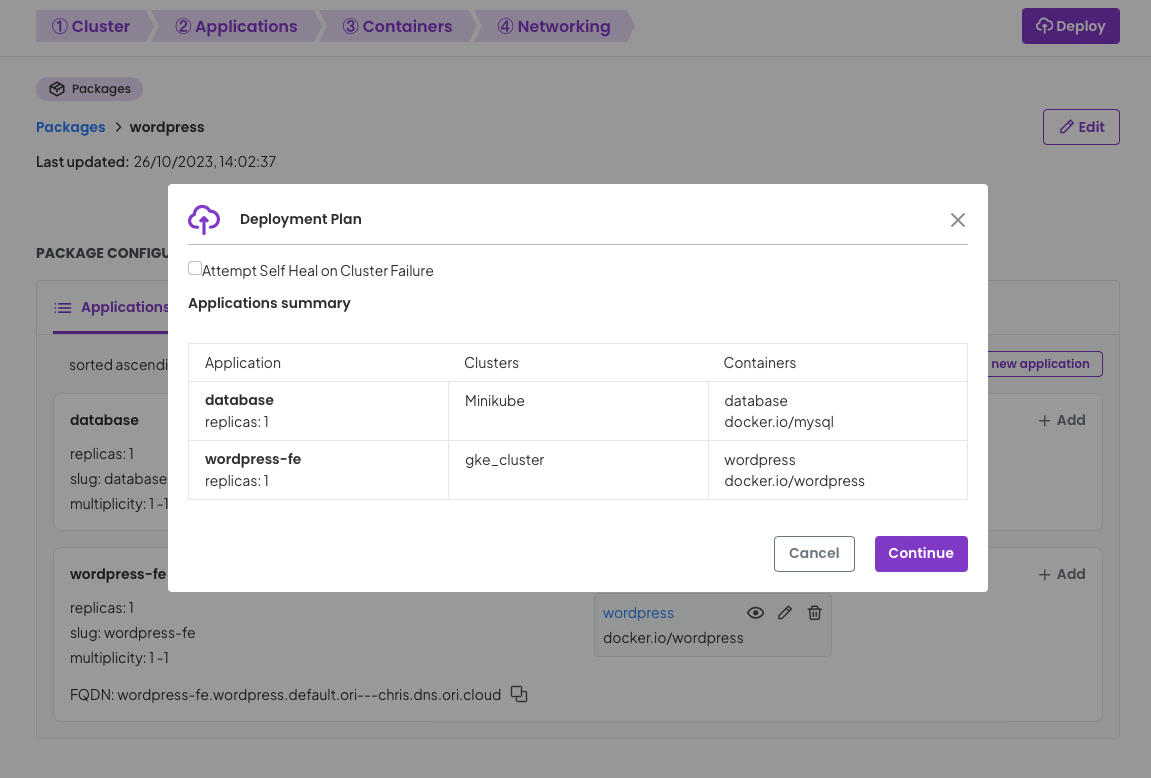
At the top of your package page there is a deploy button, click it.
Based on your package configuration available, placement rules and available clusters to your project OGC will make a plan for the deployment. We can see that the plan reflects how we have declared our package and the application placement rules.
Click Continue.
Once you click continue you will be directed to the deployment details page where after a few seconds of synchronising as OGC orchestrates your deployment to your clusters.
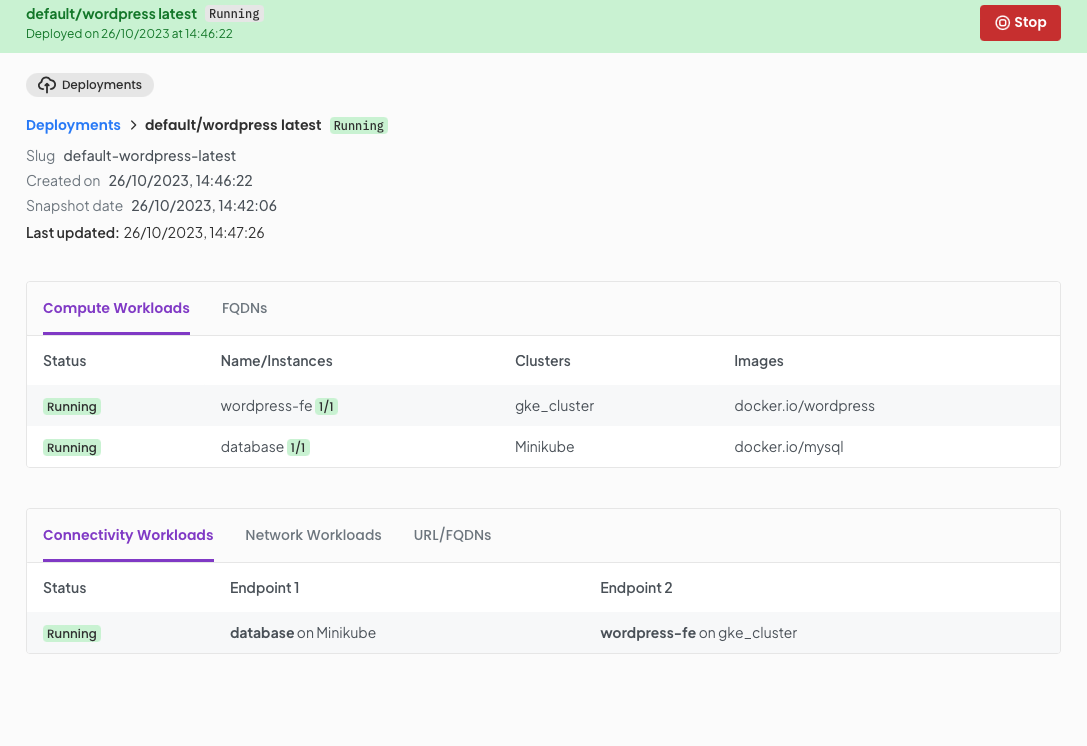

But this is all very well. you actually want to use your new wordpress package. Well click on the URL/FQDN tab and you will be presented with a stable URL you can use to access the deployment. Copy this URL and paste into your browser.
In our example this will be http://wordpress-fe.wordpress.default.ori---chris.dns.ori.cloud
You will then be presented with your wordpress application ready to use it.
In the three steps we created and on-boarded clusters to OGC, created a package for our blog site, (wordpress + database) and deployed to our clusters. Once deployed we were able to obtain a URL and were up and running! All this was achieved with a simple package definition and some vanilla Kubernetes clusters. There was no network peering, firewall configuration, manual VPN configuration, DNS setup or complex CNI configuration. It was all configured for us by the OGC orchestrator at deployment time, based on our package definition.
You no doubt will be keen to understand how this works.
When you deploy a package using OGC a deployment plan is created. This plan takes into account the package configuration and the infrastructure (cluster) capabilities associated with your project. OGC then creates deployment manifests and passes these to clusters in accordance with the plan. On the target clusters OGC has a simple agent deployed which applies manifests.
Once the application pods are running, their state is reported back to OGC continually so OGC can continue to reconcile the desired state with the actual state of the applications on clusters.
Along with workload state information, Loadbalancer and service addresses are captured to create DNS entries in public DNS. Thus giving you addressable workloads.
When an application is deployed to a cluster a VPN sidecar is created, this goes through a initiation process where it generates key material and registers with a coordination server in OGC. All connected workloads do this. Once all connected applications are registered and network ACLs are setup they establish point to point VPN tunnels on demand.
When a deployment is stopped the tunnels are torn down, authentication keys are revoked and key material deleted. Private key material never leaves the clusters.
Our journey declaring and deploying the Wordpress blog solution highlights the efficiency benefits of using the OGC orchestrator to manage placement of services and supporting structures on the underlying Kubernetes clusters.
Through a simplified package definition, we not only streamlined the deployment process but also eliminated the necessity for manual network configurations. This case study underscores the potential of OGC to automate complex orchestration tasks, ensuring a seamless communication between our front-end application and backend database.
The VPN technology orchestrated by OGC played a pivotal role in securing and facilitating the communication between different components of our setup, showcasing a robust and secure method of deploying applications. Additionally, the automated management of network tunnels, authentication keys, and other security measures reinforced the reliability and security of our deployment.
As we step back and review the process, the seamless interaction between OGC and Kubernetes not only simplified our deployment but also set a strong precedent for future projects. The ability to automate complex configurations, ensure secure communications, and maintain a high degree of control over the deployment lifecycle is invaluable in today's fast-paced DevOps environments.
This exploration has not only met our initial objectives but has opened avenues for further optimisation and automation in our deployment processes. We look forward to diving deeper into the capabilities of OGC and Kubernetes, and exploring how these technologies can continue to elevate our DevOps practices.
Ori secures your clouds environments with zero-trust microsegmented networks and secure secret management.
How to setup inter-cluster networking between two Kubernetes clusters using Cillium.
Learn how to deploy LLMs and scale inference on Ori Serverless Kubernetes, via Ollama and Open WebUI.
Build a modern GPU cloud with Ori to accelerate your AI workloads at scale.
