In a sentence, CDC or Change Data Capture is an event driven pattern that involves watching a data store for changes and then producing events to a message broker when those changes occur to then allow for an event consumer, that is listening for these messages, to consume and act upon them.
At Ori, we've been experimenting with CDC to significantly reduce complexity of handling database changes, specifically around our notification and history features.
In this post I'm going to go over a practical example of how to create a simple micro-blogging-esque application to demonstrate this pattern with a PostgreSQL database, Apache Pulsar as the message broker, Debezium for the CDC component and Go for the application code itself. Much of, if not all of, what will be demonstrated using these tools is also achievable using another type of database such as MySQL or Cassandra.
Similarly, there are alternate choices for a message broker that would also work such as Apache Kafka. If you're already familiar with Kafka and haven't yet played around with Pulsar, this makes a great excuse to do so. For using different tooling there is documentation on Debezium's website which details how you may configure for a different database or message broker.
The only commands that are to be ran on the host to get this up and running are:
dockerdocker-composegobashcurlcat
This keeps things simple and only really requires Docker and Go to be installed on most systems for you to follow along or create a similar kind of setup. While all the software we depend on, such as Postgres, will be run in Docker containers, the Go parts of the application will be compiled and ran locally.
The commands in this post can each be executed in order. They will create all the required directories and files and also get everything built and running. Also note that this example is to highlight how these tools can work together and is not an by any means a production example so far as security among other things go.
The following is a diagram of how things will look:
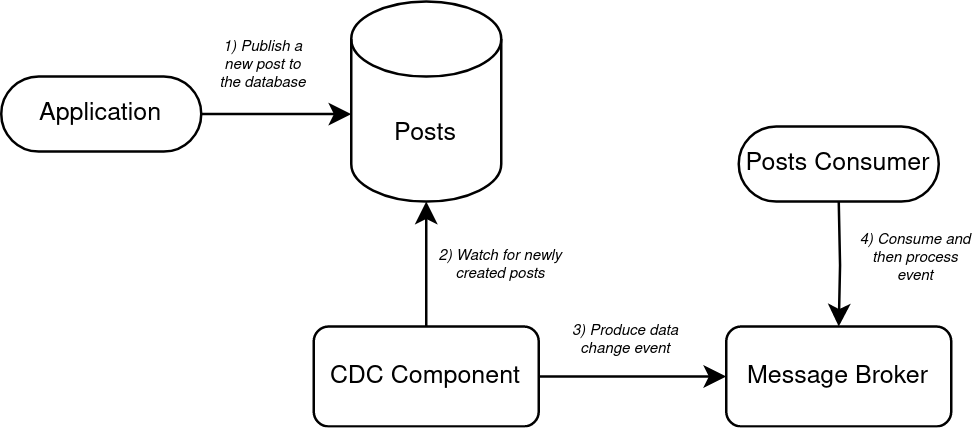
- The application has a connection to the posts database and inserts a new post into the posts table. The application in this example is written in Go and the database, as previously mentioned, is PostgreSQL.
- The CDC component captures all the data changes from the database including inserts, updates, and deletions. For this application, Debezium has been selected as the CDC Component. Debezium connects to the Postgres and monitors the transaction log to capture changes.
- When the Debezium detects that a new row has been added to the posts table, it translates that change into an event and then publishes it to Pulsar.
- An application consuming on the topic that handles new posts consumes the new event and then handles it, with whatever processing may be required at this point.
With all that in mind, lets take a look at how this can all be put together.
Creating a micro-blogging-esque application
Setup
Create a new workspace
We'll need somewhere to create the Dockerfiles and other configuration.
mkdir microblog && cd microblog
mkdir config dockerfiles scripts
Create required Docker images and config
PostgreSQL config
cat <<-'EOF' >> config/postgresql.conf.sample
# CONNECTION
listen_addresses = '*'
# MODULES
shared_preload_libraries = 'decoderbufs,wal2json'
# REPLICATION
wal_level = logical # Can be minimal, archive, hot_standby, or logical
max_wal_senders = 4 # Max number of walsender processes
max_replication_slots = 4 # Max number of replication slots
EOF
This is the sample config that we'll be using for Postgres. Adjust where needed but the main things to note here are the fact we are specifying the shared_preload_libraries as decoderbufs,wal2json as both of these will be used as part of our CDC setup. wal2json is a popular plugin that will be used with Postgres to decode data from the transaction log to JSON which we can then use to produced as an event. We also need to set the wal_level to logical. decoderbufs is the other plugin used which is the decoder used to deliver data as protocol buffers, for use with Debezium.
Dockerfiles
Rather than pulling a pre-built Docker image, we'll create them from a Dockerfile so that is it a little clearer where everything is and how the various pieces of software work with each other.
First up is the Dockerfile for our Postgres setup, which is essentially the official Postgres image with two additional plugins we chose to install.
cat <<-'EOF' >> dockerfiles/postgres.Dockerfile
FROM postgres:15
WORKDIR /
ARG USE_POSTGIS=false
ENV PROTOC_VERSION=1.4
# To keep this simple we are just going to copy the config straight into the
# image.
COPY config/postgresql.conf.sample /usr/share/postgresql/postgresql.conf.sample
RUN apt-get update \
&& apt-get install -f -y --no-install-recommends \
ca-certificates \
software-properties-common \
build-essential \
pkg-config \
git \
postgresql-server-dev-15 \
&& add-apt-repository "deb http://ftp.debian.org/debian testing main contrib" \
&& apt-get update && apt-get install -f -y --no-install-recommends \
libprotobuf-c-dev=$PROTOC_VERSION.* \
&& rm -rf /var/lib/apt/lists/*
# Install the decoderbuffs plugin.
RUN git clone https://github.com/hughcapet/postgres-decoderbufs \
&& cd /postgres-decoderbufs \
&& git fetch origin pg15_compat \
&& git checkout pg15_compat \
&& make && make install \
&& cd / \
&& rm -rf postgres-decoderbufs
# Install the wal2json plugin.
RUN git clone https://github.com/eulerto/wal2json \
&& cd /wal2json \
&& make && make install \
&& cd / \
&& rm -rf wal2json
EOF
You'll notice that a couple of things are being installed here. Two popular plugins for Postgres mentioned earlier in Postgres' configuration - the wal2json and decoderbuffs plugins. Other than that it is mostly plain old Postgres. Let's now build this image:
docker build -t microblog-postgres -f dockerfiles/postgres.Dockerfile .
And now for Pulsar:
cat <<-'EOF' >> dockerfiles/pulsar.Dockerfile
FROM apachepulsar/pulsar:3.0.0
USER root
RUN whoami && apt-get update && \
apt-get install -y wget && \
mkdir -p /pulsar/connectors && \
wget https://dlcdn.apache.org/pulsar/pulsar-3.0.0/connectors/pulsar-io-debezium-postgres-3.0.0.nar && \
mv pulsar-io-debezium-postgres-3.0.0.nar /pulsar/connectors
USER 10000
CMD ["/pulsar/bin/pulsar", "standalone"]
EOF
Notice that here all we are doing in addition to using the official Pulsar image is installing the Debezium CDC connector. Let's now build this one:
docker build -t microblog-pulsar -f dockerfiles/pulsar.Dockerfile .
With both images now built, we'll use docker-compose to bring up an instance of each:
cat <<-'EOF' >> docker-compose.yaml
version: '3.9'
services:
postgres:
image: microblog-postgres
ports:
- "5432:5432"
environment:
- POSTGRES_DB=microblog
- POSTGRES_USER=postgres
- POSTGRES_PASSWORD=password
pulsar:
image: microblog-pulsar
ports:
- "6650:6650"
command: ["/pulsar/bin/pulsar", "standalone"]
EOF
There's not a lot going on in docker-compose.yaml other than setting some env vars for Portgres and exposing ports so that we're able to connect to Postgres and Pulsar. We can now bring both of these up (you can bring these up right away or you may wait until we've also written the application code):
docker-compose up -d
Create the application
The application consists of basically three things. There is going to be an HTTP server that handles incoming requests, a database table to store new posts in and an additional application to consume events from Pulsar. We'll start with the database.
Create database
Next lets create a new schema and table for our microposts to be stored in. To make this handy for future use we'll store in a script:
cat <<-'EOF' >> scripts/create-posts-table.sh
#!/usr/bin/env bash
# Create a new microblog schema and table.
docker exec -ti $(docker ps -aqf "name=microblog-postgres") psql -U postgres -d microblog -c "
CREATE SCHEMA microblog;
CREATE TABLE microblog.posts
(
id SERIAL PRIMARY KEY,
title TEXT,
body TEXT,
created_at TIMESTAMPTZ NOT NULL DEFAULT NOW()
);"
EOF
Here we are simply creating a new schema and a new microblog.posts table to store the contents of a post. Let's now create those on-the-fly:
chmod +x scripts/create-posts-table.sh && scripts/create-posts-table.sh
Connect Debezium to Postgres
cat <<-'EOF' >> scripts/debezium-init.sh
docker exec -d $(docker ps -aqf "name=microblog-pulsar") ./bin/pulsar-admin source localrun \
--archive connectors/pulsar-io-debezium-postgres-3.0.0.nar \
--name debezium-postgres-source \
--destination-topic-name debezium-postgres-topic \
--tenant public \
--namespace default \
--source-config '
{
"database.hostname": "postgres",
"database.port": "5432",
"database.user": "postgres",
"database.password": "password",
"database.dbname": "microblog",
"database.server.name": "microblogsrv",
"schema.whitelist": "microblog",
"pulsar.service.url": "pulsar://127.0.0.1:6650"
}'
EOF
In the above command we're creating a script that executes a command in the Pulsar container which configures Debezium to watch for data changes in the tables within the microblog schema by giving Pulsar access to our database using the postgres user (you'll want to create a new Postgres user for this in a production environment).
An important point here is that the name of the topic events will be produced to are predetermined (and in our case created automatically) using this format: ${server_name}.${schema_name}.${table_name} which means that in our case we will be interested in consuming on the topic named microblogsrv.microblog.posts.
Let's get that running and detach from it.
chmod +x scripts/debezium-init.sh && scripts/debezium-init.sh
Create the application server
To start of we'll need to initialize a new Go project and fetch the required dependencies.
go mod init microblog
go get github.com/jackc/pgx/v4
go get github.com/jackc/pgx/v4/pgxpool
go get github.com/apache/pulsar-client-go/pulsar
Next we'll create the application server itself. We'll keep things as simple as possible here and not try anything fancy. Just an HTTP server using Go's http package and a simple database connection pool so that records can be created in our Postgres instance:
cat <<-'EOF' >> server.go
package main
import (
"context"
"encoding/json"
"fmt"
"io"
"log"
"net/http"
"github.com/jackc/pgx/v4/pgxpool"
)
const (
dbURL = "postgres://postgres:password@localhost:5432/microblog"
srvPort = ":3000"
)
type appServer struct {
db *pgxpool.Pool
}
func main() {
// Create a connection to the database.
pool, err := pgxpool.Connect(context.Background(), dbURL)
if err != nil {
log.Fatal("failed to connect to Postgres: %w", err)
}
defer pool.Close()
// Create a new instance of the app server.
srv := &appServer{
db: pool,
}
// Handle requests to /posts and start the HTTP server.
http.HandleFunc("/posts", srv.handleNewPost)
fmt.Printf("Starting HTTP server on %s\n", srvPort)
log.Fatal(http.ListenAndServe(srvPort, nil))
}
type createPostReq struct {
Title string `json:"title"`
Body string `json:"body"`
}
func (a *appServer) handleNewPost(rw http.ResponseWriter, r *http.Request) {
// Read the request body and create a new createPostReq from it.
body, err := io.ReadAll(r.Body)
if err != nil {
handleErr(rw, err)
return
}
var cpr createPostReq
if err := json.Unmarshal(body, &cpr); err != nil {
handleErr(rw, err)
return
}
// Create the new post in Postgres.
query := "INSERT INTO microblog.posts (title, body) VALUES ($1, $2)"
args := []interface{}{cpr.Title, cpr.Body}
if _, err := a.db.Exec(r.Context(), query, args...); err != nil {
handleErr(rw, err)
return
}
// Return a status created response. Optionally write a response body here
// to fit your needs.
rw.WriteHeader(http.StatusCreated)
}
type errorResp struct {
Msg string `json:"msg"`
}
func handleErr(rw http.ResponseWriter, err error) {
errResp := &errorResp{
Msg: err.Error(),
}
resp, _ := json.Marshal(errResp)
rw.WriteHeader(http.StatusInternalServerError)
fmt.Fprintf(rw, string(resp))
}
EOF
Let's start the server now to verify that it can connect to our database and listen on the specified port:
go run server.go
This may take a few moments to build for the first run. If all is well, you should see the following message once it is running:
Starting HTTP server on :3000
This means we can now attempt to make a request and see if our post gets created. But before we do that, lets first consume on the topic where events are produced to when new posts are created. Similar to Kafka, Pulsar also comes with a bunch of useful commands that allow you to easily interact with the instance. We'll use the pulsar-client consume command within the Pulsar container to verify that Debezium is producing these events when we create a new post.
Again we'll create a small script for the consumer so that it can be used again in the future if needed. With the server running in our initial tab, you'll need to open a new one and run the following:
cat <<-'EOF' >> scripts/consume-posts.sh
#!/usr/bin/env bash
docker exec -ti $(docker ps -aqf "name=microblog-pulsar") ./bin/pulsar-client consume \
-s "microblogsrv.microblog.posts" \
-t Shared \
public/default/microblogsrv.microblog.posts \
-n 0
EOF
And now let's execute that:
chmod +x scripts/consume-posts.sh && scripts/consume-posts.sh
There will be some initial output, and then it will wait for new events to be produced.
With Postgres, Pulsar, Debezium and our application server now all running and configured, we can open up a new terminal window and make a request to the server:
curl localhost:3000/posts -v -H "Content-type: application/json" --data '
{
"title": "My First post!",
"body": "This is the body of the first post."
}'
And if all went well, we should have got a 201 response that resembles the following:
...
> POST /posts HTTP/1.1
> Host: localhost:3000
> User-Agent: curl/7.87.0
> Accept: */*
> Content-type: application/json
> Content-Length: 85
>
* Mark bundle as not supporting multiuse
< HTTP/1.1 201 Created
...
If you now switch to the tab that is consuming messages, you should see a new message that looks similar to the following:
----- got message -----
key:[eyJpZCI6MX0=], properties:[], content:{"before":null,"after":{"id":1,"title":"My First post!","body":"This is the body of the first post.","created_at":"2023-08-11T15:13:53.610295Z"},"source":{"version":"1.9.7.Final","connector":"postgresql","name":"microblogsrv","snapshot":"false","db":"microblog","sequence":"[null,\"27585752\"]","schema":"microblog","table":"posts","txId":739,"lsn":27585752,"xmin":null},"op":"c","transaction":null}
We can expand the JSON output from that message to see what fields were set:
{
"before": null,
"after": {
"id": 1,
"title": "My First post!",
"body": "This is the body of the first post.",
"created_at": "2023-08-11T15:13:53.610295Z"
},
"source": {
"version": "1.9.7.Final",
"connector": "postgresql",
"name": "microblogsrv",
"snapshot": "false",
"db": "microblog",
"sequence": "[null,\"27585752\"]",
"schema": "microblog",
"table": "posts",
"txId": 739,
"lsn": 27585752,
"xmin": null
},
"op": "c",
"transaction": null
}
This verifies that our post was created in the database and that a message was sent to Pulsar. As you can see in the JSON message, we have access to the data in the row that was created along with some useful metadata and source data.
We can also take a look in the database to see our newly created post:
cat <<-'EOF' >> scripts/select-posts.sh
#!/usr/bin/env bash
docker exec $(docker ps -aqf "name=microblog-postgres") psql -U postgres -d microblog -s -c "SELECT * FROM microblog.posts;"
EOF
Let's now run that:
chmod +x scripts/select-posts.sh && ./scripts/select-posts.sh
This should give you the following output:
id | title | body | created_at
----+-----------------+-------------------------------------+-------------------------------
1 | My First post! | This is the body of the first post. | 2023-08-11 15:13:53.610295+00
(1 row)
Create a custom Go consumer
Going a step further with this, we can also now write our own consumer application in Go to actually do something with the event:
cat <<-'EOF' >> consumer.go
package main
import (
"context"
"encoding/json"
"fmt"
"log"
"time"
"github.com/apache/pulsar-client-go/pulsar"
)
type microblogEvent struct {
Before interface{} `json:"before"`
After struct {
Id int `json:"id"`
Title string `json:"title"`
Body string `json:"body"`
CreatedAt time.Time `json:"created_at"`
} `json:"after"`
Source struct {
Version string `json:"version"`
Connector string `json:"connector"`
Name string `json:"name"`
TsMs int64 `json:"ts_ms"`
Snapshot string `json:"snapshot"`
Db string `json:"db"`
Sequence string `json:"sequence"`
Schema string `json:"schema"`
Table string `json:"table"`
TxId int `json:"txId"`
Lsn int `json:"lsn"`
Xmin interface{} `json:"xmin"`
} `json:"source"`
Op string `json:"op"`
TsMs int64 `json:"ts_ms"`
Transaction interface{} `json:"transaction"`
}
func main() {
client, err := pulsar.NewClient(pulsar.ClientOptions{
URL: "pulsar://localhost:6650",
OperationTimeout: 30 * time.Second,
ConnectionTimeout: 30 * time.Second,
})
if err != nil {
log.Fatalf("Could not instantiate Pulsar client: %v", err)
}
defer client.Close()
log.Fatal(consume(client))
}
func consume(client pulsar.Client) error {
// Create a new consumer.
consumer, err := client.Subscribe(pulsar.ConsumerOptions{
Topic: "microblogsrv.microblog.posts",
SubscriptionName: "posts-consumer",
Type: pulsar.Shared,
})
if err != nil {
return err
}
defer consumer.Close()
for {
// Wait for messages from Pulsar.
msg, err := consumer.Receive(context.Background())
if err != nil {
return err
}
// Parse the message.
var event microblogEvent
if err := json.Unmarshal(msg.Payload(), &event); err != nil {
fmt.Printf("Error unmarshaling message: %s", err)
continue
}
// Do some processing with that data here. In this case we're just
// printing some of it out.
fmt.Printf("New post was just created titled: \"%s\"\n", event.After.Title)
// Let Pulsar know that we've processed this message by acknowledging
// it.
consumer.Ack(msg)
}
}
EOF
A few things to note in the consumer. The microblogEvent type is a type I've created based on the JSON of the Pulsar messages. I've included all fields that came with the message so that you have a better idea of what data and fields you are given access to.
Pulsar's official Go SDK is used to connect to our Pulsar instance and consume on the microblogsrv.microblog.posts topic. Once a message is received it is going to print out a message that contains the title of the newly created post.
We can now Ctrl+C out of the consumer we started earlier and start our custom Go consumer:
go run consumer.go
Note that this may also take a few moments to compile the dependencies. You'll see output indicating that the consumer has started once it is ready. In another window we can run a similar curl command to the previous one to create a second post:
curl localhost:3000/posts -v -H "Content-type: application/json" --data '
{
"title": "My Second post!",
"body": "This is the body of the second post."
}'
If you switch back to the custom consumer tab you will notice that is has received a new message and in our case will have printed out the title of the new post.
And there we have an end-to-end sample application that demonstrates how you can implement CDC using Postgres, Pulsar, Debezium and Go. To bring everything down it is as simple as:
docker-compose down
To run a second time given that the Docker images are already built, we can use the scripts created throughout this post to get everything running again like so and verify it is all working:
# A TLDR set of commands to re-create the application environment.
docker-compose up -d # It may be worth waiting a couple of seconds after running this
./scripts/create-posts-table.sh
./scripts/debezium-init.sh
go run server.go
go run consumer.go
curl localhost:3000/posts -v -H "Content-type: application/json" --data '
{
"title": "My First post!",
"body": "This is the body of the first post."
}'
./scripts/select-posts.sh
And with that we have a very simple end-to-end application that utilises Debezium to demonstrate CDC in a fairly hands-on manner. There are lots of use cases to CDC. Some common ones include audit logging, keeping data in sync across a microservice architecture, data replication, cache invalidation and the list goes on. The basic idea is that we are becoming reactive to our data and can act when changes to data occur.