How to Perform a Cost-per-Token Analysis of Self-Hosted LLMs Using BeFOri: DBRX from Databricks
Discover how to use BeFOri to calculate a cost per input and output token for self hosted models and apply this methodology to the DBRX Base model from Databricks.
With the explosive growth of new AI applications, many companies are faced with uncertainty around what costs they will incur to bring their wildest AI dreams to market. At Ori we are partnering with many of our customers to help them transition from the training stage of development into production deployed inference applications. Developers leveraging open source models have to choose between accessing these models through pay-per-token APIs or hosting the model themselves. Each choice comes with its own set of trade-offs but cost is the deciding factor for most. In a recent survey we conducted, 54% of respondents reported that price is the most important factor, and 77% put price in their top 3 factors.
To this end, we have observed that self-hosting typically becomes the lower cost option when an application has scaled to the point that the GPUs are highly utilised, or used in offline batching applications. While self-hosting provides less flexibility in scaling up (unless you’re building with Ori's serverless Kubernetes offering), the costs can be predicted with far more certainty up to the capacity limit. This is one of the reasons we have been hard at work on our Serverless Kubernetes service to provide a deployment solution that enables customers to only pay for the infrastructure they require. If you’re interested in getting started with Ori’s Kubernetes offering, get in touch with us.
In the meantime, we will review a methodology for comparing self-hosted (virtual or bare metal machines) and pay-per-token APIs and apply this to the recently released DBRX mixture of experts model from Databricks.
Architecting Applications of LLMs for Inference
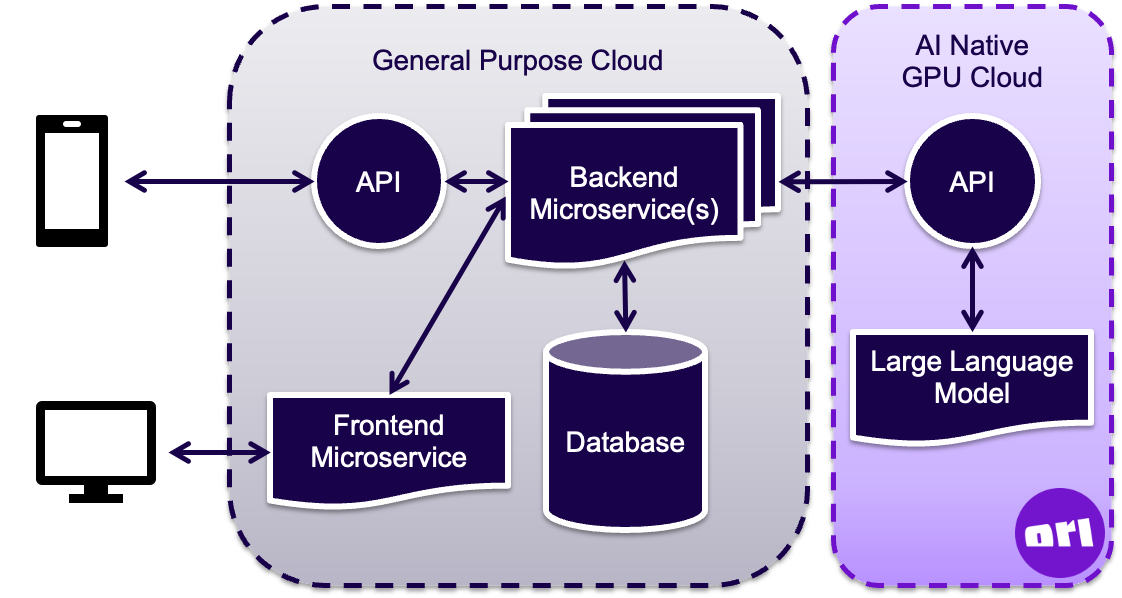
Before we dive into the cost analysis, let’s consider a typical architecture for AI applications that underpin some of the assumptions we use for the cost analysis. To make the most efficient use of resources, and following the best practices around microservice architecture, applications should be designed to separate the application layer from the LLMs they utilise.
While this is the de facto result of leveraging a third party API for your LLM, when self hosting this is the most common design we have seen deployed. A simplified architecture diagram is provided below to illustrate this approach. This separation of the AI infrastructure from traditional general purpose cloud deployments allows us to calculate the cost of running the LLM independent of the cost of running the full application. By prorating this cost per input and out token, we are able to make an apples-to-apples comparison.
The monolithic alternative with the application running on the GPU alongside the LLM typically results in a CPU bottleneck limiting the performance of the LLM and driving up infrastructure costs unnecessarily. This also makes it difficult to decouple the cost of the application from the LLM, obscuring improvements from optimisations. The trade off here becomes the added latency from the transfer of data between the clouds, similar to the latency experienced with calling a third-party API. Fortunately these can be negligible relative to the time required for inference, and you have the opportunity to optimise this latency within your application when self-hosting.
How to Perform a Cost Analysis Using BeFOri
Here we walk through the steps to calculate the cost-per-token for a self-hosted model. The alternative is calculating the cost per month for calling an API provided model. We opt for the former because an API cost analysis will be very sensitive to the number of calls, length of the actual prompts sent, and lenth of responses received after deploying.
Methodology: Calculate Cost-per-Token for Self-Hosted LLMs
Select the model you want to deploy, including the size where multiple parameter counts are available.
Identify the maximum number of concurrent requests you need to support.
Estimate the average number of prompt input tokens, and a standard deviation representative of the variation in this average.
Estimate the average number of response output tokens, and a standard deviation representative of the variations in this average.
Use BeFOri to benchmark performance on a virtual machine or bare metal server large enough to support your model with the required number of concurrent requests.
Deploy a suitable virtual machine or bare metal server in the Ori Console, and note the GPUpriceper month.
Connect and install the dependencies for running your model such as Nvidia drivers, Cuda, Pytorch, ppa, and fabric manager.
Clone the BeFOri repo and install the required python libraries.
Setup a configuration file to run a batch of benchmarks with the configurations identified above and an increasing number of concurrent requests. It is recommended that the max_completed_requests is at least 10 times the num_concurrent_requests.
Run the benchmarks to obtain the overall token throughput. Using screen will allow you to close the connection to the machine and reconnect later to check the results.
After the benchmarks run, check the summary results file for the following metrics:
results_end_to_end_latency_s_mean(tete)
results_ttft_s_mean(ttft)
results_number_input_tokens_mean(Nin)
results_number_output_tokens_mean(Nout)
num_concurrent_requests(Rconcurrent)
Use these metrics to calculate the input token throughput (Tin) and the cost per input token:
Use these metrics to calculate the output token throughput (Tout) and the cost per output token:
Conceptual Approach
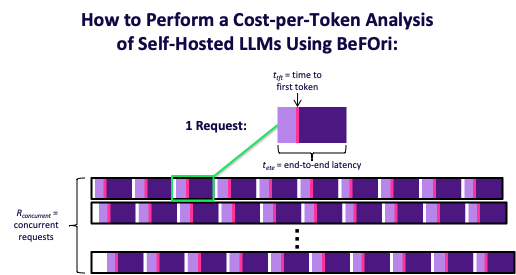
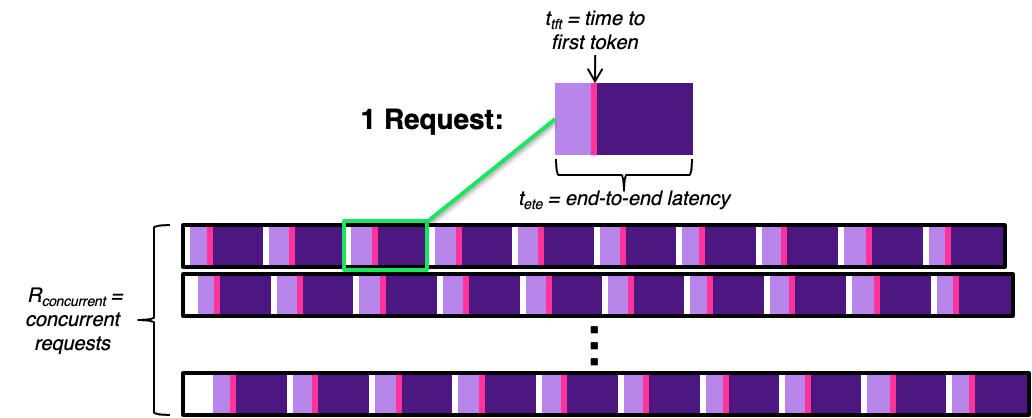
The primary challenge is allocating the total time to run the benchmark between input and output tokens while also accounting for the concurrent requests. This visualisation depicts a BeFOri run (not to scale):
Each row represents a thread of requests to the model. The white gaps represent a new request being made, and the pink lines indicate the time when the first token is returned by the model. We allocate the time before the first token is generated (light purple) to the cost of processing the input tokens and the remaining time (dark purple) to the cost of generating the output tokens.
DBRX from Databricks
Databricks released their open-source mixture of experts DBRX model on 27 March 2024. Both the base model and the fine-tuned Instruct version for few-turn interactions boast 132 B total parameters and 16 experts, and 2 experts active on any input. This is considered a fine-grained mixture of experts because it uses a larger number of smaller experts. DBRX was pretrained on 12 T tokens of curated data with a maximum context window of 32k tokens. They leveraged the Databricks stack of tools with 3072 NVIDIA H100 chips connected by an Infiniband.
This approach has paid off for the team at Databricks, achieving an average score of 74.47 for DBRX Instruct and 71.90 for DBRX Base on the HuggingFace Legacy Open LLM Leaderboard. Last week HuggingFace updated their Open LLM Leaderboard, and DBRX Instruct scored 25.58 under the new scoring (DBRX Base's new score is not yet available). Databricks also reported that DBRX Instruct surpassed other leading open source models including LLaMa2-70B, Mixtral, and Grok-1 in Language Understanding (MMLU), Programming (HumanEval), and Math (GSM8K). They also report DBRX Instruct outperforms GPT-3.5 and is competitive with Gemini 1.0 Pro and Mistral Medium when compared to leading closed models.
API access to DBRX is currently only available to Databricks Mosaic AI platform customers. However the Baseand Instruct models are available to download on HuggingFace, along with a model repositoryon GitHub all under an open licence.
Tutorial: Deploying DBRX on Ori
The following tutorial will walk you through the steps to run DBRX Base on Ori’s 8xH100 bare metal servers. Ori offers this with both the PCIe and SXM module form factors. SXM offers NVLink technology providing higher interconnect bandwidth at a slightly higher price.
This can be adjusted for deployment on smaller virtual machines by ensuring the Nvidia driver version installed is within the list of compatible driver versions.
A few things to note:
Our bare metal servers come with a newer version of the Nvidia drivers and Cuda installed, so these are first uninstalled before installing version 535 server.
Nvidia Fabric Manager forms a single memory store across all the available GPUs and is compatible with machines that have multiple V100, A100, H100 and H800 chips. If your machine is not compatible with Fabric Manager you can skip the steps to install.
We use a nifty tool called screen to perform a long running benchmark without needing to keep the SSH tunnel open. You can reconnect and resume the screen at a later date to view the benchmark results in the terminal or check the results files saved to the path passed in to the command line argument “--results-dir”.
We set the environment variable HF_HOME to `/dev/shm` in order to access the RAM available on our bare metal servers. Failing to do so will result in out of memory errors. This directory may vary depending on the underlying infrastructure, but our support team can help confirm the appropriate path for your VM or bare metal server.
# SSH into your Ori VM, the ip address can be found in the Ori console ssh root@##.##.###.###
# check compatible driver versions sudo ubuntu-drivers list --gpgpu
Below we apply the methodology described above to demonstrate its use.
Select the model you want to deploy, including the size where multiple parameter counts are available. We selected DBRX Base because we’ve seen interest in the model from prospective customers recently, and we were impressed with the model’s performance.
Identify the maximum number of concurrent requests you need to support. Our analysis covers up to 512 concurrent requests to demonstrate BeFOri’s ability to handle large scale deployments.
Estimate the average number of prompt input tokens, and a standard deviation representative of the variation in this average. We used a mean of 64 input tokens with astandard deviation of 8 tokens.
Estimate the average number of response output tokens, and a standard deviation representative of the variations in this average. We requested a mean of 128 output tokens with a standard deviation of 8 tokens.
Use BeFOri to benchmark performance on a virtual machine or bare metal server large enough to support your model with the required number of concurrent requests.
Deploy a suitable virtual machine or bare metal server in the Ori Console, and note the GPUprice per month. We used a bare metal server with 8xH100 PCIe GPUswhich costs $20,000 per month through the Ori console.
Connect and install the dependencies for running your model such as Nvidia drivers, Cuda, Pytorch, ppa, and fabric manager. Refer to the tutorial above.
Clone the BeFOri repo and install the required python libraries. Refer to the tutorial above.
Setup a configuration file to run a batch of benchmarks with the configurations identified above and an increasing number of concurrent requests. This is the configuration file we used:
Run the benchmarks to obtain the overall token throughput. These are commands we ran using screen, you just need to replace the "path/to/file.yaml" with the location of the configuration file above:
# start screen screen
# run benchmark cd ./BeFOri/ python3 token_benchmark_ray.py --batch-config-file /path/to/file.yaml
# Ctrl-A then D to get out of your screen
# Check running screens screen -ls
# Resume running screen screen -r $screen_running
VI.After the benchmarks run, check the summary results file for the following metrics:
results_end_to_end_latency_s_mean (tete)
results_ttft_s_mean (ttft)
results_number_input_tokens_mean (Nin)
results_number_output_tokens_mean (Nout)
num_concurrent_requests (Rconcurrent)
Print out each summary result file with the cat function, for example:
6. Use these metrics to calculate the input token throughput (Tin) and the cost per input token:
Concurrent Requests (Rconcurrent)
1
2
4
8
16
24
32
Mean Input Tokens per Request (Nin)
65.1000
64.2000
64.5500
63.7625
63.3813
63.6125
63.7531
Time to First Token (ttft)
47.4256
60.1374
56.4676
50.0456
51.3750
53.6781
61.0651
Input Token Throughput (Tin)
1.3727
2.1351
4.5725
10.1927
19.7392
28.4417
33.4086
Price Per Input Token (US$)
0.005621
0.003614
0.001687
0.000757
0.000391
0.000271
0.000231
Concurrent Requests (Rconcurrent)
40
48
56
64
128
256
512
Mean Input Tokens per Request (Nin)
63.7125
64.0083
63.9214
63.8844
63.7398
63.6738
63.6953
Time to First Token (ttft)
63.2785
64.7879
74.3808
83.8888
202.5574
425.9254
1051.1940
Input Token Throughput (Tin)
40.2743
47.4224
48.1253
48.7383
40.2785
38.2708
31.0238
Price Per Input Token (US$)
0.000192
0.000163
0.000160
0.000158
0.000192
0.000202
0.000249
7. Use these metrics to calculate the output token throughput (Tout) and the cost per output token:
Concurrent Requests (Rconcurrent)
1
2
4
8
16
24
32
Mean Output Tokens per Request (Nout)
121.1000
135.5000
143.0000
146.9000
148.5688
147.1583
148.0688
End-to-End Latency (tete)
611.1326
1005.3901
1044.7683
1025.8838
1051.9588
1066.1931
1126.9538
Time to First Token (ttft)
47.4256
60.1374
56.4676
50.0456
51.3750
53.6781
61.0651
Output Token Throughput (Tout)
0.2148
0.2867
0.5788
1.2043
2.3757
3.4881
4.4453
Price Per Input Token (US$)
0.0359173
0.0269137
0.0133318
0.0064071
0.0032479
0.0022121
0.0017358
Concurrent Requests (Rconcurrent)
40
48
56
64
128
256
512
Mean Output Tokens per Request (Nout)
121.1000
135.5000
143.0000
146.9000
148.5688
147.1583
148.0688
End-to-End Latency (tete)
611.1326
1005.3901
1044.7683
1025.8838
1051.9588
1066.1931
1126.9538
Time to First Token (ttft)
47.4256
60.1374
56.4676
50.0456
51.3750
53.6781
61.0651
Output Token Throughput (Tout)
0.2148
0.2867
0.5788
1.2043
2.3757
3.4881
4.4453
Price Per Input Token (US$)
0.0359173
0.0269137
0.0133318
0.0064071
0.0032479
0.0022121
0.0017358
Cost Analysis
Below you can see a graph of the cost per input and output token as the number of concurrent requests increases.
While the 8xH100 bare metal server can support over 1,000 concurrent requests to DBRX Base, we can see that the optimal cost is near 64 concurrent requests because the overall throughput declines above this. The minimum price per token we were able to achieve was $0.000158 per input token or $158.32 per million input tokens and $0.001259 per output token or $1,259.35 per million output tokens. It is also notable that the cost does not increase much in the range from 40 concurrent requests to 256 concurrent requests, providing a target utilisation range for self hosting.
While Databricks has not made their cost per token for the API access to DBRX publicly available (and declined to respond when I requested this information), these prices are higher than Open AI’s prices for GPT-4 Turbo, one of the most expensive models available today. This means self-hosting without further inference optimisation is likely not the lowest cost option. Databricks has partnered with Nvidia to implement TensorRT to decrease latency and provided an example in the TensorRT-LLM Github repo. While they do not publish metrics around how much TensorRT has sped up inference on DBRX, Nvidia has reported a 4x - 8x increase in inference performance with other models.
For those who prioritise data privacy and sovereignty, self-hosting is still the best option, despite the higher cost. At Ori we work with customers to build custom private clouds and we offer VMs, bare metal servers and serverless Kubernetes through our public cloud where you can fine-tune and run inference without exposing your data to model providers such as Databricks.
Conclusion
We’ve now covered how to use BeFOri to calculate a cost per input and output token for self hosted models and applied this methodology to the DBRX Base model from Databricks. We hope this provides a helpful tutorial for anyone interested in performing a similar cost analysis or running DBRX themselves.
One major critique we see of this analysis is the short prompt length (63.9 tokens on average) and short response lengths (144.1 tokens on average). These decisions were made to decrease the time to run benchmarks as this is meant illustrate the methodology. We are hard at work on providing future benchmarks with a more realistic input prompts and longer response lengths to provide more usable benchmarks. Part of this effort includes improving the prompt sampling in BeFOri to move away from randomly selecting from a repository of Shakespearean sonnets to more realistic prompts. Beyond these improvements, we are also looking to integrate inferencing engines like TensorRT into BeFOri so we can benchmark the optimisation and verify Nvidia's results. Stay tuned for new blog posts and content with these updates.
That being said, our analysis did determine for DBRX Base running on a 8xH100 PCIe bare metal server, you should aim to run between 40 and 256 concurrent requests for optimal cost and throughput. Within this range you can expect to pay $158 to $202 per million input tokens and $1,259 - $1,489 per million output tokens.